Saturday, April 30, 2011

FRUIT SALSA WITH BAKED CINNAMON CHIPS


  • FRUIT SALSA WITH BAKED CINNAMON CHIPS
  • via All Recipes

  • 2 kiwis, peeled and diced
  • 2 Golden Delicious apples - peeled, cored and diced
  • 8 ounces raspberries
  • 1 pound strawberries
  • 2 tablespoons white sugar
  • 1 tablespoon brown sugar
  • 3 tablespoons fruit preserves, any flavor
  •  
  • 10 (10 inch) flour tortillas
  • Butter flavored cooking spray
  • 2 tablespoons cinnamon sugar
In a large bowl, thoroughly mix kiwis, Golden Delicious apples, raspberries, strawberries, white sugar, brown sugar and fruit preserves. Cover and chill in the refrigerator at least 15 minutes.
Preheat oven to 350 degrees F (175 degrees C).
Coat one side of each flour tortilla with butter flavored cooking spray. Cut into wedges and arrange in a single layer on a large baking sheet. Sprinkle wedges with desired amount of cinnamon sugar. Spray again with cooking spray.
Bake in the preheated oven 8 to 10 minutes. Repeat with any remaining tortilla wedges. Allow to cool approximately 15 minutes. Serve with chilled fruit mixture.

Wednesday, April 20, 2011

Tuesday, April 19, 2011

SO CUTE AND SO WRONG!?!

Peeps S'mores
photo & recipe via Eclectic Recipes

Peeps
Graham Crackers
Hershey's Chocolate Squares

Place Peeps and Hershey's Chocolate squares on graham crackers. Zap in the microwave until soft (or place under a broiler). Place graham cracker square on top.

What a clever idea...and a great way to get rid of all those Peeps!

OH THAT MARTHA!

Martha Stewart and her staff always come up with the cutest ideas and I am loving this one! Fill your egg cups with mini bouquets and place them on a cake stand tier. What a great centerpiece!
photo via Martha Stewart

Saturday, April 16, 2011

Friday, April 15, 2011

HAPPY GRILLED CHEESE MONTH!

JalapeƱo Popper Grilled Cheese Sandwich
recipe & photo via Becky Bakes

  • 2 jalapeno peppers, cut in half lengthwise and seeded
  • 2 slices sourdough bread
  • 1 tablespoon butter, room temperature
  • 1 tablespoon cream cheese, room temperature
  • 1/4 cup jack and cheddar cheese, shredded
  • 1 tablespoon tortilla chips, crumbled 
Place the peppers on a baking sheet with the cut side down. Broil on the top rack for 8-14 minutes until the peppers are blackened. Place in a ziplock bag and seal. Let cool until you can handle them, about 20 minutes. Remove the skins from the peppers. They should “pinch” off easily. Assemble the sandwich and grill 2-3 minutes per side. Feast!

Friday, April 1, 2011

A LITTLE SWEET, A LITTLE SOUR

Sweet & Sour Chicken Meatballs
photo & recipe via Naturally Ella

2 slices bread
1/2 medium onion, diced
1 clove garlic, minced
1/2 tablespoon sunflower oil (I couldn't bring myself to spend $7.99, so I used olive oil)
1 pound ground chicken
1/4 cup fresh parsley (1 tablespoon dry)
1 egg
1 (8 ounce) can pineapple pieces, drained (set juice aside for sauce)

Sauce
1 cup ketchup
1/4 cup natural sugar (I used granulated sugar)
1/4 cup pineapple juice
1 1/2 tablespoons Worcestershire sauce
Pinch cayenne pepper

Preheat oven to 400 degrees. In a small skillet, heat sunflower oil over medium heat. Add onions and garlic; cook until onions are transparent (about 3 to 4 minutes). Set aside to cool slightly.

Using a food processor, turn bread into crumbs (or shred with your hands). In a large bowl, combine meatball ingredients (everything except pineapples); stir until everything is mixed thoroughly. Shape into 12 meatballs (I had about 17 and it barely filled a 9x13 pan). Sprinkle pineapple pieces over meatballs.

In a small bowl, whisk together ingredients for sauce, adjusting sugar and pineapple juice for desired sweetness. Once ready, cover meatballs in sauce. Bake for 23-25 minutes (took me about 30) until meatballs are cooked all the way through. Delicioso!!!

Saturday, March 19, 2011

COOLEST RECIPE SITE EVER!


Creative people never cease to amaze me! This super adorable website--They Cook & Draw--accepts recipes/illustrations from artists all over the world. What a feast for your eyes...and tummy!

Friday, March 11, 2011

A PLACE TO CALL HOME

Colorado!!! I have so much to say and so many photos to post, but I am going to start out slow-ly. Our new neighborhood is called Roxborough Park and it really does feel like we are living in a park (it could be for all I know?)! We are nestled in the foothills of the Rockies with spectacular views every way you turn, with giant red rock formations scattered throughout.

There are herds of mule deer and golden foxes roaming around everywhere...and rumor has it we also have mountain lion and bear dens up on the hill. Oh my! And the trails, wow the trails are everywhere; you can bike, hike or walk on miles of trails. (If only I could get used to the eleveation--5751 feet--and not feel like I was dying every time I went for a walk!) Also here is the Arrowhead Golf Club, which is consistently ranked as one of the most beautiful golf courses in the US.

I look forward to waking up each morning just so I can stare out the window at my view. The homes in our neighborhood are all different (what a concept) and built into the landscape to look as natural as possible. It is phenomenal, what else can I say! The following photos were taken at our playground...I may never leave this place.
You can see the Denver skyline (squint hard) in between the giant red rocks. Must buy telephoto lens!
Sophie enjoying the playground equipment, all of which had a perfectly weathered and worn look.
View of our neighborhood, with the golf course in between it and the park. I wish you all could see it in person...truly breathtaking.


Monday, January 17, 2011

BLANKET SCARF, OH HOW I ADORE YOU

I bought myself this blanket scarf by Tinley Road for Christmas. And then I bought one for my Mom, and then another one for my Mother-In-Law. I pretty much think every woman in the world should have one. It is fabulous! Sorry I can't buy one for everyone, but click on the link if you want one too!

P.S. I just noticed it was on sale for $26.99! Hurry!!!

Saturday, January 8, 2011

I WOULD HAVE PREFERRED BOOTS

Let me tell you what our good ol' pal Santa brought us this year! 5 bouts of influenza (2 wonderful versions), 1 ear infection, 2 cases of conjunctivitis (seriously disgusting!), 1 sinus infection, 1 yeast infection brought on by amoxicillin (sorry Soph), 1 very expensive ER visit, borderline pneumonia AND a missed holiday trip home to Missouri! This was just Sophie and I! The boys managed to go through the month of December unscathed...unbelievable! I'm thinking next year has to be better.

Come on 2011! Be good to us! And may you all be loved, healthy & happy in the new year! 

Tuesday, December 14, 2010

candy cane kiss cookies

CANDY CANE KISS COOKIES
photo & recipe via Recipe Girl


Forget about all those "other" Christmas cookie recipes, you only need this one! I don't even like mint flavored anything, but I can NOT stop eating these. And so far they have been a big hit with everyone! My only tip would be to take them out at 10 minutes, leaving them a bit gooey in the middle. I found the smaller the balls, the cuter the cookies; so get extra Kisses if you make them small.

1 1/2 cups powdered sugar
1¼ cups unsalted butter, at room temperature
1 tsp peppermint extract, optional (I left it out)
1 tsp vanilla extract
1 large egg
3 cups all-purpose flour
1 tsp baking powder
½ tsp salt
1/2 cup finely chopped Candy Cane flavored Hershey’s Kisses
Granulated sugar
Additional, unwrapped Candy Cane Kisses- about 60 (large bag)

1. Preheat oven to 350°F. Make room in either refrigerator or freezer for your cookie sheet.

2. In large mixer bowl, combine powdered sugar, butter, extracts and egg. Beat at medium speed, scraping bowl often until creamy (2-3 minutes). In a separate bowl, whisk together flour, baking powder and salt. Add to wet mixture and beat, scraping bowl often until well blended (1-2 minutes). The mixture will be a bit crumbly. Stir in chopped Kisses.

3. Shape dough into ¾-inch to 1-inch balls; roll in granulated sugar. Place 1-inch apart on cookie sheet. Bake for 10-12 minutes or until set. As soon as they come out of the oven, press a Candy Cane Kiss in the center of each cookie. They’ll crack a little around the edges, so just use your fingers to kind of hold the cookie together while you set the kiss inside. Put cookie sheet (with cookies) immediately into the freezer (preferred) or refrigerator so that the Kisses will set quickly. As soon as you press them into the cookie, they will begin to soften… so if you can get them into the freezer then they will keep their Kiss shape.

4. Store in a covered container at room temperature for up to a week. In the freezer they should be okay for a couple of weeks.

Yield: About 2 1/2 dozen

Friday, December 3, 2010

me want cookies!!!!

"Sometimes me think what is love, and then me think love is what last cookie is for. Me give up the last cookie for you." ~Cookie Monster

The holidays!! A perfect excuse to do some MORE baking! Love it! I keep several folders online of recipes I want to try and these are just a few from my baking (my most cherished!) archives. Since so many people go to cookie exchange parties this time of year, I thought I would post some cookie ideas. I haven't tried these yet though, so don't blame me if they aren't as tasty as they look. Happy baking everyone!
Rolo Cookies
Ginger Sandwich Cookies
Peppermint Candy Cookies
Florida Christmas Cookies
Old-Fashioned Soft Pumpkin Cookies
Homemade Oreos
Pumpkin Cookies with Caramel Frosting

Friday, November 26, 2010

CARAMEL APPLE CHEESECAKE BARS


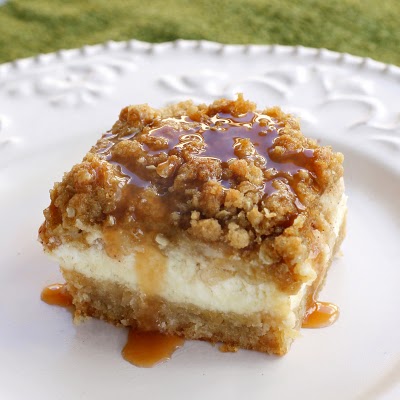
Caramel Apple Cheesecake Bars
Rich would be the first word that comes to mind when eating these! Wow! But a really great dessert for a large crowd.  

Crust:
2 cups all-purpose flour
1/2 cup firmly packed brown sugar
1 cup (2 sticks) butter, softened 

Cheesecake Filling:
3 (8-ounce) packages cream cheese, softened
3/4 cup sugar, plus 2 tablespoons, divided
3 large eggs
1 1/2 teaspoons vanilla extract

Apples:
3 Granny Smith apples, peeled, cored and finely chopped
1/2 teaspoon ground cinnamon
1/4 teaspoon ground nutmeg

1/2 cup caramel topping

Preheat oven to 350 degrees F.

In a medium bowl, combine flour and brown sugar. Cut in butter with a pastry blender until mixture is crumbly. Press evenly into a 9x13 baking pan lined with heavy-duty aluminum foil. Bake 15 minutes or until lightly browned.

In a large bowl, beat cream cheese with 3/4 cup sugar in an electric mixer at medium speed until smooth. Then add eggs, 1 at a time, and vanilla. Stir to combine. Pour over warm crust.

In a small bowl, stir together chopped apples, remaining 2 tablespoons sugar, cinnamon, and nutmeg. Spoon evenly over cream cheese mixture. 

Streusel Topping:
1 cup firmly packed brown sugar
1 cup all-purpose flour
1/2 cup quick cooking oats
1/2 cup (1 stick) butter, softened

In a small bowl, combine all streusel ingredients; sprinkle evenly with streusel topping. 

Bake 40-45 minutes, or until filling is set. Drizzle with caramel topping (I did this as I served them) and let cool. Serve cold and enjoy!

photo & recipe via The Girl Who Ate Everything
recipe adapted from Paula Deen

Sunday, November 7, 2010

PINK PETTISKIRTS & POLKADOTS


One year has come and gone my sweet girl. You learned to crawl, walk & dance; you are your big brother's shadow (wow does he love you, and you him); and you have become YOU...cuddly, independent, strong in body & mind, determined, beautiful & silly. 

I can't wait to watch you grow. And baby girl, the things coming your way will be magical and wonderful, and difficult and sad, but it will be your amazing life. Embrace it all and LIVE it well.

Monday, October 18, 2010

THOMPSON FARM AND NURSERY


We spent the day at Thompson Farm in Bucksville, SC, and we could not believe that we had never heard of this place! Julious and Amanda Thompson (who had 15 children by the way!) began their life together here in 1845; the house pictured above was built in 1825 by SC Legislator, Cornelius Sarvis. It is still a working farm operated by the fourth generation of Thompson's.
 
They have a phenomenal 8-acre corn maze (pictured below) designed by the biggest corn maze designer in the U.S. Our fearless leader, Drew, led us through to the end...a journey which takes on average an hour and a half! And I am fairly confident that had I led our way, it would have taken at least two!
Just along the edge of the corn maze, was this lovely spot where we took some photos of our Sophie. Lanterns hanging from a large tree with a wagon set next to it, with vases full of beautiful flowers. Beautiful spot for an impromptu photo shoot!
The fun doesn't end at the corn maze! Pappy's Play Area was a quaint, lovely little spot filled with various activities for the kiddos: large corn bin (Sophie did not want to get out!), goat tower, hen house, duck races, and enough things for the children to play on to keep them very happy!

Here it is! The design is different every year and it is phenomenal. Would highly recommend this wonderful farm; I'm only sorry we didn't know about it sooner!

Saturday, October 16, 2010

PLANET LUNCHBOX TO THE RESCUE!

Well I finally broke down and bought Drew a lunchbox, not just any lunchbox for my kiddo...a Planet Lunchbox! You may think I'm crazy for spending this much ($70 including shipping!!), but I have my reasons: Planet Lunchboxes are eco-friendly (eliminates disposable containers and bags) durable, promote healthy eating, made of food-safe stainless steel, and it will last him for years. And you don't HAVE to buy the magnets or the carry bag, or the extra containers (I just did it for ease). I want my kiddos to eat as healthy as possible; I'm sick of kids being fed processed, frozen foods.

P.S. He was so excited when he got it last night that he made me serve his dinner in it!

WHAT SAYS FALL BETTER THAN THIS?


photo via itsy bitsy foodies


Sunday, October 3, 2010

PUMPKIN SPICE OATMEAL COOKIES

PUMPKIN SPICE OATMEAL COOKIES
recipe via The Nerd's Wife

2 sticks butter, softened
1 cup brown sugar
1/2 cup granulated sugar
1 tsp vanilla
2 eggs
1 1/2 cups flour
1/2 tsp salt
1 tsp baking soda
1 tsp pumpkin pie spice
3 cups rolled oats

Preheat oven to 350 degrees. Cream together the butter, sugar and brown sugar until light and fluffy. Add in the eggs and vanilla; mix well. Mix the flour, baking soda, salt and pumpkin pie spice; gradually add to butter mixture. Stir in the oats until incorporated.

Drop by tablespoon onto a baking sheet about two inches apart. Bake for 10-12 minutes at 350 degrees until golden brown. (I left them in for 10 minutes and took them out when they were still a little gooey in the middle, they will bake a bit more on the pan.) Makes about 3 dozen. Enjoy my lil' pumpkins!


LinkWithin

Related Posts with Thumbnails